What is a SageMaker Notebook?

SageMaker Notebook is a web-based integrated development environment (IDE) that is used for building, training, and deploying machine learning models. It is a fully managed service provided by Amazon Web Services (AWS) that allows data scientists and developers to work with their data, code, and models in a single, collaborative environment.
Table of Contents
- Features of SageMaker Notebook
- How to use SageMaker Notebook
- Common Errors and How to Handle Them
- Conclusion
Features of SageMaker Notebook
SageMaker Notebook provides a rich set of features that are designed to make it easy for data scientists and developers to build and deploy machine learning models. Some of the key features of SageMaker Notebook include:
1. Pre-installed libraries and frameworks
SageMaker Notebook comes with pre-installed libraries and frameworks such as TensorFlow, PyTorch, MXNet, and Scikit-learn. This makes it easy for data scientists and developers to start building their models without having to worry about installing and configuring these libraries and frameworks.
2. Customizable environments
SageMaker Notebook allows data scientists and developers to create custom environments that are tailored to their specific needs. They can create their own Docker images, install their own libraries and frameworks, and configure their own runtime environments.
3. Collaboration and sharing
SageMaker Notebook allows data scientists and developers to collaborate and share their work with others. They can share their notebooks with their team members, and work together on the same notebook in real-time.
4. Auto-scaling
SageMaker Notebook automatically scales the underlying infrastructure based on the workload. This means that data scientists and developers don’t have to worry about provisioning and managing the infrastructure themselves.
5. Integration with other AWS services
SageMaker Notebook integrates with other AWS services such as S3, EC2, and Lambda. This makes it easy for data scientists and developers to access their data and build their models using other AWS services.
How to use SageMaker Notebook
Using SageMaker Notebook is easy. Here are the steps to get started:
1. Create a notebook instance
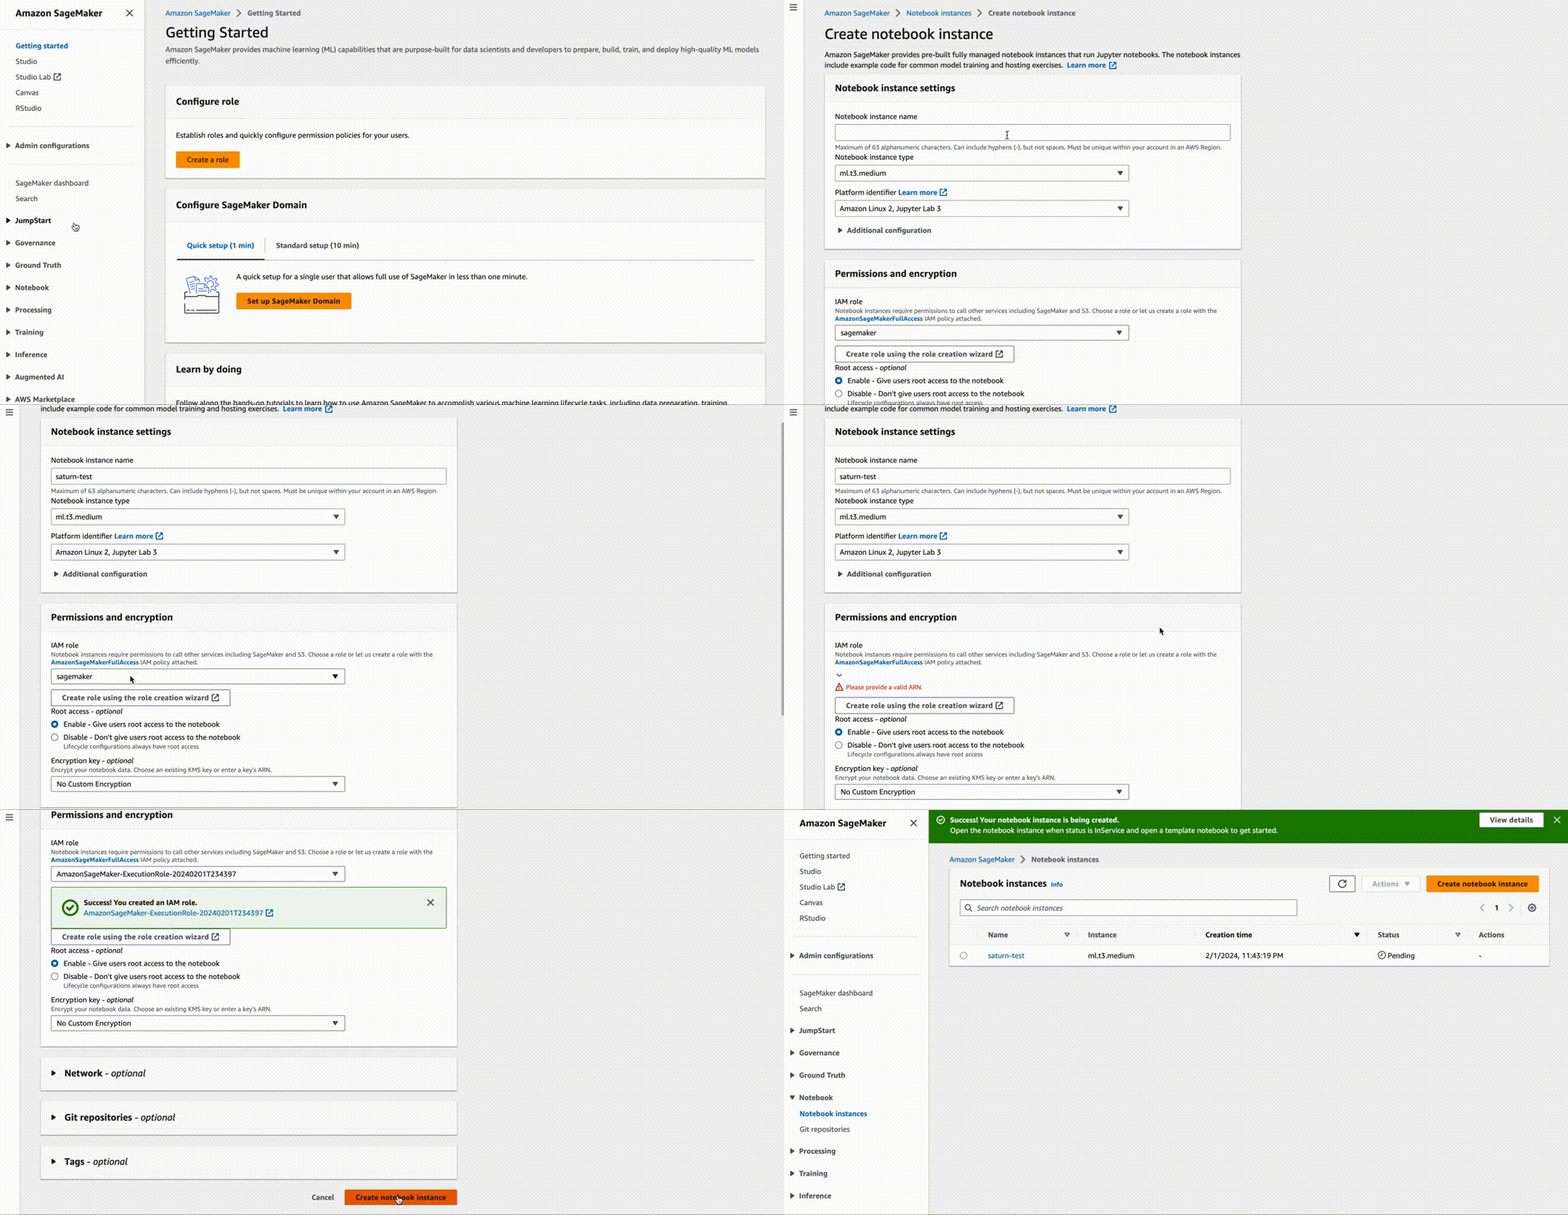
The first step is to create a notebook instance. This can be done using the AWS Management Console or the AWS CLI. When creating a notebook instance, you can choose the instance type, the IAM role, and the VPC settings.

Access the Amazon SageMaker console by visiting https://console.aws.amazon.com/sagemaker/. Navigate to Notebook instances and select Create notebook instance.
On the Create notebook instance page, input the following details (retain default values for any unspecified fields):
Provide a name for your notebook instance in the Notebook instance name field.
Choose
ml.t2.mediumfor Notebook Instance type. This instance type is cost-effective and suitable for this exercise. Ifml.t2.mediumis unavailable in your current AWS Region, opt forml.t3.medium.Select a Platform Identifier to define the notebook instance’s Operating System and JupyterLab version. Refer to Amazon Linux 2 notebook instances for platform identifier types, and check JupyterLab versioning for details on available versions.
For IAM role, opt for Create a new role, and then proceed to Create role. This automatically establishes an IAM role with permissions to access any S3 bucket containing “sagemaker” in its name. The role is granted these permissions via the AmazonSageMakerFullAccess policy, which is attached by SageMaker.
Note: If you wish to extend IAM role permissions to access S3 buckets without “sagemaker” in the name, you must attach the S3FullAccess policy or limit permissions to specific S3 buckets. For guidance and examples on adding bucket policies to the IAM role, refer to Bucket Policy Examples.
Choose Create notebook instance.
Within a few minutes, SageMaker initiates an ML compute instance (a notebook instance) and associates a 5 GB Amazon EBS storage volume with it. The notebook instance comes preconfigured with a Jupyter notebook server, SageMaker and AWS SDK libraries, and a set of Anaconda libraries.
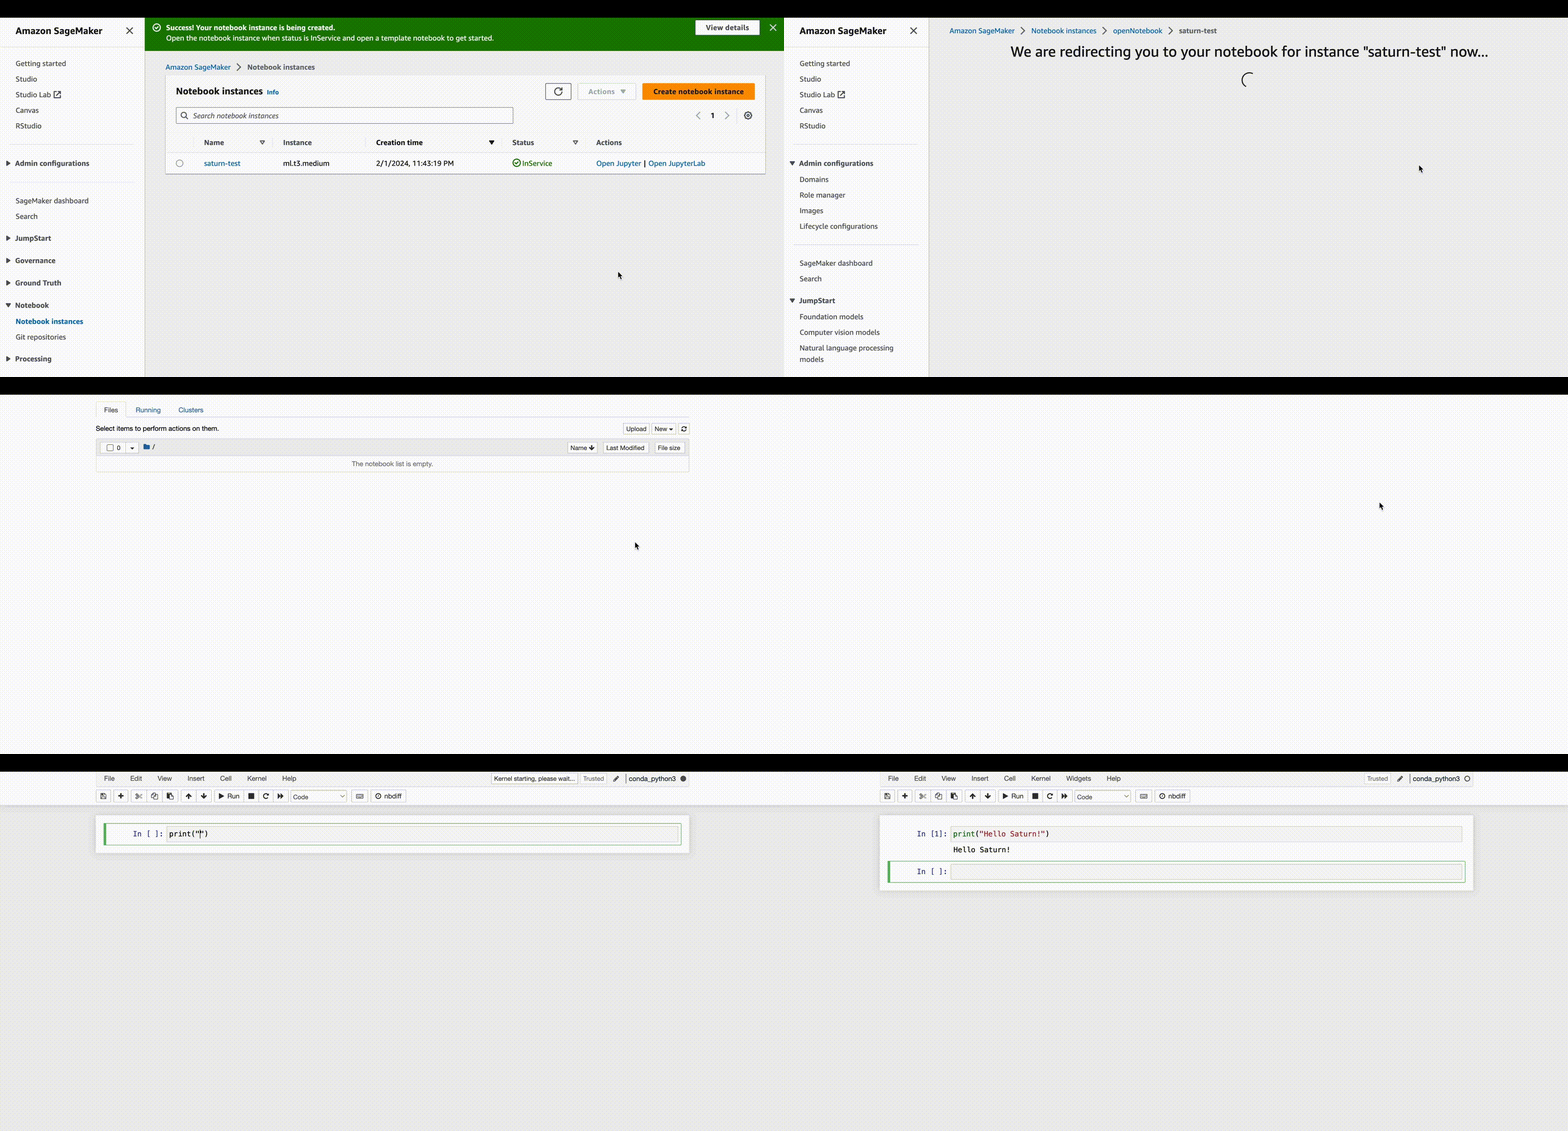
2. Open the notebook
Once the notebook instance is created, you can open the notebook using the SageMaker Notebook interface. This will launch a Jupyter notebook in your web browser.

3. Start building your model
You can start building your model by writing code in the notebook. You can use pre-installed libraries and frameworks, or install your own libraries and frameworks.
4. Train and deploy your model
Once you have built your model, you can train it using SageMaker’s built-in training algorithms, or you can bring your own training code. After training, you can deploy your model using SageMaker’s built-in hosting service, or you can deploy it to your own infrastructure.
Common Errors and How to Handle Them in SageMaker Notebook:
1. IAM Role Permission Issues:
- Error: If you encounter permission-related issues while creating or using a SageMaker Notebook instance, it might be due to insufficient IAM role permissions.
- Handling: Double-check the IAM role assigned to the notebook instance. Ensure it has the necessary permissions to access resources like S3 buckets and other AWS services. You may need to update the IAM role with additional policies based on your specific requirements.
2. Instance Type Unavailability:
- Error: The specified instance type, such as ml.t2.medium, might be unavailable in your AWS region during notebook instance creation.
- Handling: Choose an alternative instance type, like ml.t3.medium, based on availability in your region. Be aware of cost implications and adjust the instance type according to your needs.
3. Network Configuration Issues:
- Error: If there are issues with VPC settings during notebook instance creation, it could lead to connectivity problems.
- Handling: Ensure that the VPC settings are correctly configured. Double-check security group and subnet configurations to allow proper network connectivity. Consult AWS documentation for VPC setup if needed.
4. Jupyter Notebook Launch Failure:
- Error: The Jupyter notebook may fail to launch in the web browser after creating the notebook instance.
- Handling: Check for browser compatibility and ensure there are no network/firewall issues. Restart the notebook instance and attempt to launch the Jupyter notebook again. If the problem persists, review the instance logs for any errors.
5. Code Execution Failures:
- Error: While building your model, you may encounter code execution failures due to library compatibility issues or missing dependencies.
- Handling: Review your code and ensure compatibility with the pre-installed libraries and frameworks. If using custom libraries, make sure they are correctly installed in the notebook environment. Check the notebook instance logs for specific error messages.
6. Training Algorithm Compatibility Issues:
- Error: During model training, you might face compatibility issues with SageMaker’s built-in training algorithms.
- Handling: Verify that your model and dataset are compatible with the selected training algorithm. Check SageMaker documentation for supported algorithms and ensure your code adheres to the required input and output formats.
7. Deployment Failures:
- Error: Issues may arise during model deployment, whether using SageMaker’s hosting service or deploying to your own infrastructure.
- Handling: Review deployment configurations and ensure that dependencies are correctly specified. Check for any size limitations on the deployment target. If deploying to your infrastructure, validate that the environment meets the necessary requirements.
Conclusion
SageMaker Notebook is a powerful tool for data scientists and developers who want to build, train, and deploy machine learning models. With its rich set of features, customizable environments, and integration with other AWS services, SageMaker Notebook makes it easy to work with data, code, and models in a single, collaborative environment. If you’re a data scientist or developer who is looking for a powerful and easy-to-use machine learning IDE, SageMaker Notebook is definitely worth checking out.
About Saturn Cloud
Saturn Cloud is a portable AI platform that installs securely in any cloud account. Build, deploy, scale and collaborate on AI/ML workloads-no long term contracts, no vendor lock-in. Join today and get 150 hours of free compute per month.
Saturn Cloud provides customizable, ready-to-use cloud environments for collaborative data teams.
Try Saturn Cloud and join thousands of users moving to the cloud without
having to switch tools.


