Using JupyterHub with a Private Container Registry


In our previous blog post on JupyterHub, we walked through the basic deployment steps for The Littlest JupyterHub (TLJH) and Zero-to-JupyterHub (ZTJH). Our recommendation for anyone looking to deploy JupyterHub as a Data Science platform in production was to use ZTJH. We’ll assume you’re using that for this blog post.
Once you have Zero-JupyterHub up and running, security is the top priority. You should feel confident that your data science platform is safe and that your users can access it easily. One of the first things you will need to do is load images from private container registries. Without this integration, all images you use will have to be hosted publicly, which is a non-starter for most enterprises.
Saturn Cloud provides customizable, ready-to-use cloud environments
for collaborative data teams.
Try Saturn Cloud and join thousands of users moving to the cloud without having to switch tools.
Reminder: the helm upgrade command
As described in the previous post, Helm is the Kubernetes package manager used to install and update JupyterHub running on our Kubernetes cluster and in our case deployed on AWS EKS.
When we update config.yaml, we will run the helm upgrade command, given below. We will refer back to it throughout the blog post:
helm upgrade --cleanup-on-fail \
  <your-release-name> jupyterhub/jupyterhub \
  --namespace <your-namespace> \
  --version=<JH-helm-chart-version> \
  --values config.yaml
NOTE: In our previous post, we recommended that you save your values, those in brackets
<...>, as comments in yourconfig.yaml.
<your-release-name>- given that the same “chart” (package) can be installed multiple times on the same Kubernetes cluster, this release name is simply a way of distinguishing between those different installations.- In our case, we used
ztjh-release.
- In our case, we used
<your-namespace>- this is the Kubernetes namespace that JupyterHub will be created in. If that namespace doesn’t exist, it will create it for you.- In our case, we went with
ztjh.
- In our case, we went with
<JH-helm-chart-version>- each version of JupyterHub is associated with a Helm chart version. Reference this document for more details.- In our case, because we are deploying JupyterHub version 1.5, we use Helm chart version
1.2.0.
- In our case, because we are deploying JupyterHub version 1.5, we use Helm chart version
Handling secrets for private image registries
In our specific case, we will cover how to pull private Docker images stored on AWS Elastic Container Registry (ECR).
There are many reasons why you might want to use personal container images on your JupyterHub. Perhaps you need to create a bespoke environment for your data science team, outfitted with all the necessary tools they will need to get their work done. Or from the security perspective, you are interested in having broader control over the kinds of packages that are installed and would like the ability to regularly perform additional security scans. Custom workspace options like these can be accomplished by creating images with specific packages and configurations, storing those images, and launching them when users log into your JupyterHub.
Be sure to install these two prerequisites before proceeding: - aws-cli - the command line interface to interact with AWS - docker - a tool to build and push images to a private registry
Prepare private image registry We will start by creating an ECR repository for our private images and then configure our JupyterHub to pull a particular image when a user launches their workspace, aka JupyterLab.
- Create ECR repo from AWS console
Log into AWS console and navigate to ECR service. For a more detailed tutorial, see the AWS ECR docs: Creating a private repository.
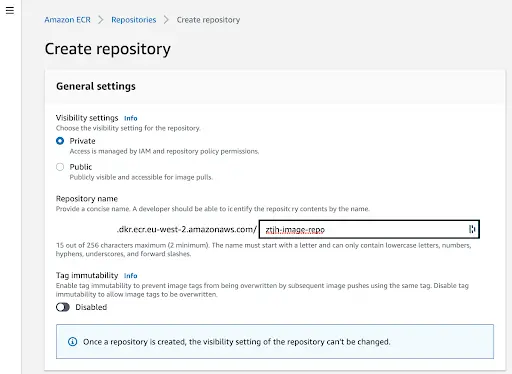
Click “Create repository”:

Then give this new image repo a name and click “Create”. In our example, we chose ztjh-image-repo.

- Prepare the private image you want to use To keep things simple for this blog, we will pull a publicly available JupyterHub image from Docker Hub to use for the rest of these steps. Keep in mind that for your production environment, you might want to customize your image by either creating it from scratch or by modifying an existing image.
Pull jupyterhub/singleuser image from Dockerhub.
docker pull jupyterhub/singleuser
To make modifications to this image you will need to edit the Dockerfile and build it locally before pushing it up to ECR. The Dockerfile for the jupyterhub/singleuser image can be found in the JupyterHub GitHub repo.
- Create and push your images up to ECR
Now that you have an image you would like to use, push it up to ECR. The steps are below, but for a more detailed tutorial, see the AWS ECR docs: Pushing a Docker image.
The first step is passing your AWS login information to the docker CLI so that it can handle the push. You’ll need your AWS region and aws_account_id.
aws ecr get-login-password --region <region> | docker login --username AWS --password-stdin <aws_account_id>.dkr.ecr.<region>.amazonaws.com
Next tag your image appropriately. In our case, <your-ecr-repo-name> is ztjh-image-repo, we kept the tag the same, singleuser.
docker tag jupyterhub/singleuser
<aws_account_id>.dkr.ecr.<region>.amazonaws.com/<your-ecr-repo-name>:<tag>
Finally, push your docker image up to ECR. This process will take a few minutes depending on how large your image is and how fast your network upload speeds are.
docker push <aws_account_id>.dkr.ecr.<region>.amazonaws.com/<your-ecr-repo-name>:<tag>
You can log into AWS and navigate to the ECR repo you created to verify that it was successfully pushed up.
Create secret to access private image registry
At this point, you have created and pushed the image you would like to be used whenever your users launch JupyterHub. You might be wondering how your JupyterHub cluster has access to the private image registry. This is where Kubernetes ‘secrets’ come into play. To use them, we will need to update the config.yaml and redeploy.
The ZTJH has documentation on all of the configuration items that can be made to the config.yaml, but for our purposes we are interested in two sections, imagePullSecret and singleuser.image.
- Add
imagePullSecretto theconfig.yamlIn your existingconfig.yamladd the following section.
imagePullSecret:
  create: true
  registry: <aws_account_id>.dkr.ecr.<region>.amazonaws.com/<your-ecr-repo-name>
  email: <your-email-address>
  username: aws
  password: aws ecr get-login-password --region <region> | cut -d' ' -f6
This section will create the Kubernetes secret needed to login to AWS ECR when it needs to pull the private image. The name of this secret is image-pull-secret and once created, can be viewed using a kubectl command, which we will show below.
- Add
singleuser.imageto theconfig.yamlNow we will update the config.yaml to use the private image we referenced above whenever a new user launches JupyterHub. Add the following section.
singleuser:
  image:
    name: <aws_account_id>.dkr.ecr.<region>.amazonaws.com/<your-ecr-repo-name>
    tag: <tag>
- Run the
helm upgradecommand For both of these changes to take hold, we will need to run thehelm upgradecommand. This might take a few minutes so be patient.
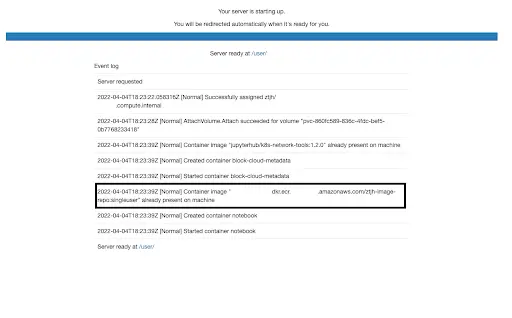
Once complete, you can verify that the changes are working by logging in and launching JupyterHub.

When your JupyterLab has finally launched, you may also notice that he UI for this particular image, jupyterhub/singleuser is also different from what we started with. This is another indication that the process worked.
For those interested, you can view the image-pull-secret using the following command:
kubectl describe secrets image-pull-secret -n <your-namespace>
You might notice that the actual ‘secret’ itself, i.e. the username and password, is hidden.
Conclusion
Using private container registries is a must for any enterprise. There is much more to cover on security so feel free to review the security section of the Zero-to-JupyterHub docs.
Ultimately, we hope this blog helped you understand the steps needed to provide a base level of security and some of the reasons each piece helps to keep your JupyterHub safe. It is certainly important to consider security early in your deployment so that you can establish the necessary protocols before your users log in. By properly securing your data science platform, you can prevent vulnerabilities that bad actors can exploit.
Saturn Cloud provides customizable, ready-to-use cloud environments
for collaborative data teams.
Try Saturn Cloud and join thousands of users moving to the cloud without having to switch tools.
Check out other resources on setting up JupyterHub:
- Setting up JupyterHub
- Setting up JupyterHub Securely on AWS
- Setting up HTTPS and SSL for JupyterHub
- Setting up JupyterHub with Single Sign-on (SSO) on AWS
- List: How to Setup Jupyter Notebooks on EC2
- List: How to Set Up JupyterHub on AWS
About Saturn Cloud
Saturn Cloud is a portable AI platform that installs securely in any cloud account. Build, deploy, scale and collaborate on AI/ML workloads-no long term contracts, no vendor lock-in.
Saturn Cloud provides customizable, ready-to-use cloud environments
for collaborative data teams.
Try Saturn Cloud and join thousands of users moving to the cloud without having to switch tools.


